총 소요시간 : 14시간
코드 : https://github.com/roselidev/todolist_notion
일단 로고를 만들고,
Notion에서 DB API키를 딴다

노션에 가서 API 등록하는 과정은
노마드 코더 영상을 전적으로 참고하였다.
10분도 안되는 영상이니 보고 그냥 따라하면 된다.
노션 developers 사이트(https://developers.notion.com/)에 가서
우상단 View my integrations - New Integrations(+버튼)
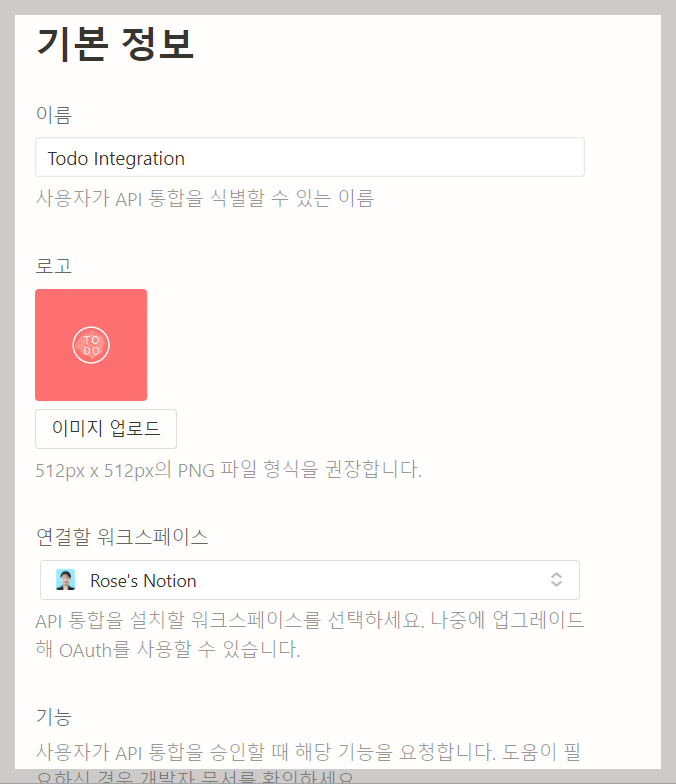
이렇게 Integrations 정보를 입력한다음 저장을 눌러준다.
* 여기서 Integrations란?
Notion integrations connect tools like Jira, Google Drive, and Slack to Notion, to help supercharge your workflow. Integrations are built using Notion's API.
번역 : Jira, GDrive, Slack을 노션에서 사용할 수 있게 해주는 Tool이며 Notion API에 의해 생성됨.
노션에서 만든 용어로,
본 프로젝트의 경우 "내가 만든 WebApp"을 노션에서 사용할 수 있게 만들어주는 커스텀 플러그인 정도로 이해할 수 있을듯하다.
그 다음으로는
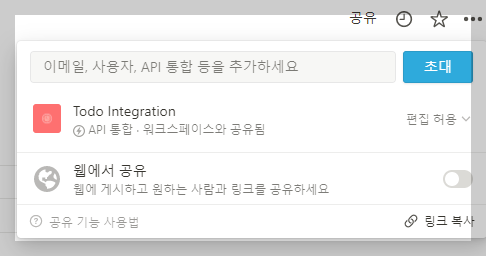
노션에서 데이터베이스를 만들어준다음, 데이터베이스 페이지에서 integrator API 편집권한을 허용해준다.
이렇게 해서 API 세팅은 모두 완료!
이제 웹앱을 만들어보자.
일단 기본 웹서버를 만들어준다. (server.js, public 폴더)
VanillaJS를 연습하려고 하는 프로젝트이기 때문에
Node.js, Express, HTML+CSS+JS 조합으로 가장 기본적인 웹앱구조를 만들어주었다.
.
├── public
│ ├── index.html
│ ├── index.css
│ └── index.js
└── server.js
노션 API를 추가하면서는 몇개 파일이 추가되긴 하지만 기본 구조는 위와 같다.
참고로 완성된 코드는 맨 위에 깃헙 링크에서 볼 수 있다.
각 파일을 예쁘게 완성해주고
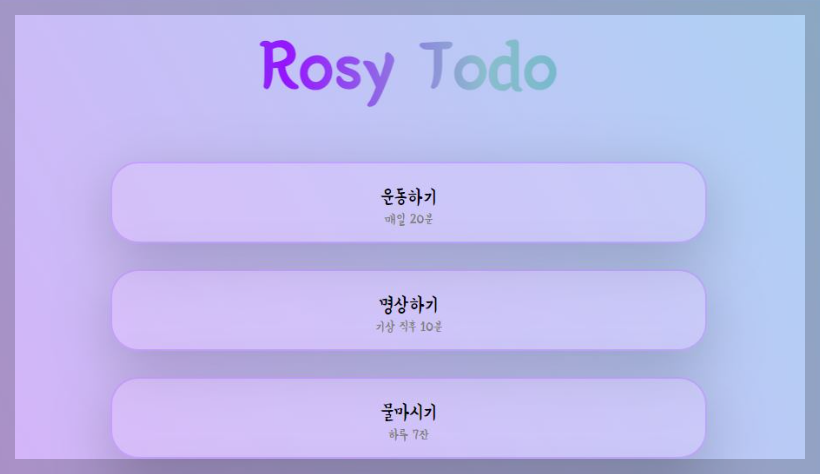
위 운동하기, 명상하기, 물마시기 항목을 notion DB와 연동시키는 것이 목적이다.
이렇게 프로토타입을 완성한 다음,
node server명령어만 입력하면 로컬에서 웹서버가 구동된다.
이렇게 해서 웹앱 80% 완성!
이제 노션 API와 연동을 시켜줄 것이다.
소스코드가 있는 node 환경에 notion 라이브러리를 깔아준다.
npm install @notionhq/client투두앱과 연결할 노션 DB는 이렇게 생겼다.

우선 아무곳에나 notion.js를 작성하여 DB 데이터를 불러올 수 있는지 테스트를 해본다.
//https://github.com/roselidev/todolist_notion/blob/master/notion-test.js

require('dotenv').config(); // load your api key and db id
const { Client } = require('@notionhq/client'); // notion-js library
const util = require('util') // will unfold all [Object]s when consol.log results.

const notion = new Client({ auth: process.env.NOTION_API_KEY }); // create notion client
const databaseId = process.env.NOTION_API_DATABASE; // set db id

const getDatabase = async function () { // async get db data
  const response = await notion.databases.query({ database_id: databaseId }); // notion API call

  const res = response // TODO: change this, below is sample code.
  // const res = response.results.map((row) =>{
  //   return {
  //       title: row.properties.title.title[0].plain_text, // TODO: change this
  //       detail: row.properties.detail.rich_text[0].plain_text // TOOD: change this
  //   };
  // });

  console.log(util.inspect(res, false, null, true));

  return res;
};

getDatabase();
+) 참고로 터미널에 프린트할 때 `console.log(response)` 말고 `console.log(util.inspect(response, false, null, true))` 를 쓰면 중간에 축약되어 나오는 [Object] 표시 없이 구조체 전체를 볼 수 있다.
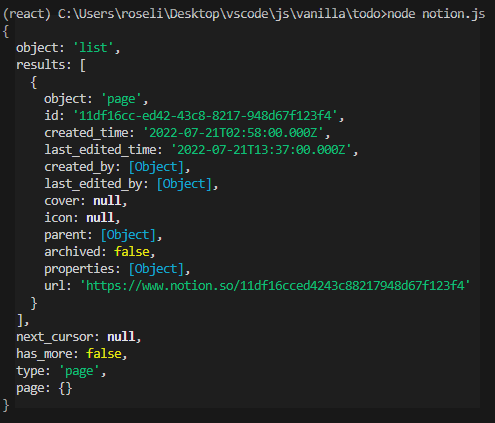
내가 찾고싶은 title열, detail열의 텍스트는 어디있나 찾아준다.
근데 잠깐만...
왜째서 다 비어있는거냐...?

정답은... notion API version이 안맞았음.
https://stackoverflow.com/questions/72989189/notion-api-missing-property-value
notion api missing property value
This is a problem that occurred during the process of retrieving the value of the database by using notion API. The communication is successful, so the json data is being parsed, but there is a pro...
stackoverflow.com
npm install @notionhq/client@0.4.4그래서 다운그레이드를 해줬다.
아무래도 최신버젼이 불안정하거나 내 컴이 마이 꾸진듯하다.
어쨋든 다운그레이드를 하니 notion DB 페이지에 입력한 데이터가 잘 불러와진다.

이제
투두앱에서 +버튼 (form submit)을 클릭하면 노션DB에 내 웹앱에서 입력한 항목이 추가되고,
노션DB에서 데이터를 다시 reload 하여 투두앱에 그리도록 코드를 짜준다.
modules/notion.js
//https://github.com/roselidev/todolist_notion/blob/master/modules/notion.js

require('dotenv').config(); // load your api key and db id
const { Client } = require('@notionhq/client'); // import notion-js library

const notion = new Client({ auth: process.env.NOTION_API_KEY }); // create notion client
const databaseId = process.env.NOTION_API_DATABASE; // set db id

exports.getDatabase = async function () { // get db data
  const response = await notion.databases.query({ database_id: databaseId });

  const res = response.results.map((row) =>{
     return {
         title: row.properties.title.title[0].plain_text,
         detail: row.properties.detail.rich_text[0].plain_text
     };
   });
  return res;
};

exports.addDatabase = async function(req) { // add db data
  const response = await notion.pages.create({
    "parent":{
      "type": "database_id",
      "database_id": databaseId,
    },
    "properties": {
      "detail": {
        "rich_text": [
          {
            "text": { "content": req.body.detail}
          }
        ]
      },
      "title": {
        "title": [
          {
            "text": { "content": req.body.title}
          }
        ]
      }
    }
  });
  if(response.object === 'page'){
    response.status = 200;
  }
  return response.status;
}
노션 API와 통신하면서 노션 DB항목을 불러오거나, 노션 DB항목을 추가하는 모듈이다.
그다음 form.js
//https://github.com/roselidev/todolist_notion/blob/master/public/form.js

const form = document.querySelector('.js-form'),
showBtn = document.querySelector('.js-button');

const addDataToBackend = async (req) => {
    const status = await fetch('http://localhost:3000/', {method:"POST", body: JSON.stringify({title, detail})});
    if (status === 200){
        location.reload(true);
    } else{
        alert('Not Submitted! Try again.');
    }
};

function showForm(){
    form.style.display = 'flex';
    form.style.flexDirection = 'column';
}

function init(){
    showBtn.onclick = showForm;
    form.onsubmit = addDataToBackend;
}

init();
form component를 새로 만들어서 submit을 하면 노션 DB로 POST하는 url로 form submit url을 지정해준다.
마지막으로 server.js에서
//https://github.com/roselidev/todolist_notion/blob/master/server.js

var express = require('express'); // import server engine

const getDatabase = require('./modules/notion').getDatabase; // import function from notion api caller
const addDatabase = require('./modules/notion').addDatabase; // import function from notion api caller
const bodyParser = require('body-parser'); // import middleware used to parse response after POST
const PORT = 3000; // set server port

const app = express(); // create server
var http = require('http').Server(app); // import http and create http server

app.use(express.static(__dirname + '/public')); // allow access to public folder
app.use(express.urlencoded({extended: true,})); // allow db fetch
app.use(bodyParser.json()); // for parsing POST response
app.use(bodyParser.urlencoded({ extended: true })); // for parsing POST response

app.get('/notion', async (req, res) => { // fetch db
    const notion = await getDatabase();
    res.json(notion);
});

app.get('/', function(req, res){  // listen to end-user access
    res.sendFile(__dirname + '/public/index.html');
});

app.post('/', async (req, res) => { // listen to end-user form submit
    const res_add = await addDatabase(req);
    if(res_add === 200){
        res.redirect("/");
    }
});

http.listen(PORT, function(){ // run
  console.log('Server is running');
});
form submit url로 요청이 들어오면 노션 모듈 중 DB추가하는 코드를 호출해주고
추가가 완료되면 페이지를 리프레시 하여 노션 DB항목을 불러와서 웹앱에 그려준다.
요렇게 해서 Notion DB와 연동까지 한 웹앱 완성~
이제 배포과정이 남았는데,
GCP로 배포할 생각이다.
공개적으로 배포를 할려면 form data validation도 해줘야하고, 도메인도 따야하고,
좀 귀찮은 일이 많아서 언제할지는 잘 모르겠다 (...)


